Wednesday, December 3, 2008

Permission Denied - SQL Express 2005 Problem

I installed SQL Express 2005 on my Windows Vista PC and a SQL Server Express 2005 instance with the name GopinathMPC\SQLExpress is created successfully.

As a first step of using the new SQL Server Express 2005 I started creating a database with the query

CREATE DATABASE TestDB

GO

Unexpectedly execution of the above query failed with the following error message

Msg 262, Level 14, State 1, Server GOPINATHM-PC\SQLEXPRESS, Line 1
CREATE DATABASE permission denied in database 'master'.

The error message indicates that I don't have enough permissions to create the database. The login which I'm using to access my Windows Vista has administrative privileges, but still I'm not granted administrative privileges on the SQL Server instance.

Looking through the documentation of SQL Server Express, I found the that

Windows Vista users that are members of the Windows Administrators group are not automatically granted permission to connect to SQL Server, and they are not automatically granted administrative privileges.

Now it is very clear that event though I'm an administrator on my Windows Vista OS I don't have administrative rights on SQL Express 2005 Server. So I need to get administrative rights.

How to Grant Administrative Rights on SQL Express 2005?

  1. Log in to Windows Vista using your administrative account
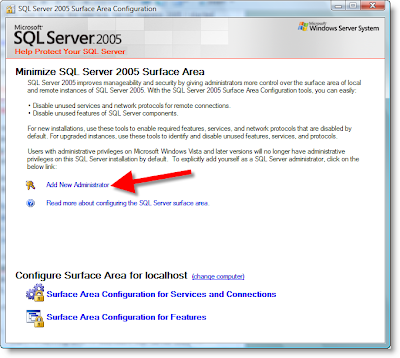
  2. Open SQL Server Surface Area Configuration Application ( Start --> All Programs --> Microsoft SQL Server 2005 --> Configuration Tools -->SQL Server Surface Area Configuration)
  3. Click on Add New Administrator (pointed in the image) link

CREATE DATABASE Permission Denied - SQL Express 2005 - Image 1

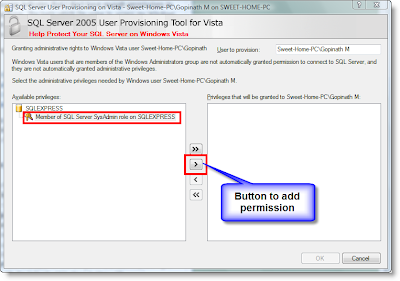
  1. A new window with title 'SQL Server User Provisioning on Vista' popup and displays the permissions on the left panel.
  2. Select the permission 'Member of SQL Server SysAdmin role on SQLEXPRESS' available on the left panel and add it to the right panel with the help of add button( button with > text) available in the window.

CREATE DATABASE Permission Denied - SQL Express 2005 - Image 2

  1. Click on OK button to save the changes.
  2. That's all now your Windows login has administrative privileges on SQL Server.

HAPPY DATA-BASING

A Tour on 3rd Party tools

1. DevExpress

2. Infragistics

3. Telerik

4. ComponentOne
5. Caphyan Advance Installer.
6. Aqua Data Studio (for E-R designs)
7. Farpoint Spread
8. DotNet Bars
9. Source Offsite
10. Multisite
11. ClearQuest
12. Fiddler
13. Report Sharp Shooter

Monday, December 1, 2008

Top Reasons why we should have requirement documents?

1. Requirements are not features. You simply must know what your users must have to do their jobs. Distinguish thoughtfully and carefully between what is needed and what the vendor is offering. At the same time, you must be able to factor into the requirements documentation other considerations, such as budget limitations and regulatory constraints. You will need to train your users how to specify their requirements, which takes tact, training, and patience. A request usually starts with: "All I really need is " and then wanders away. A vague or ambiguous statement -- regardless of its intent -- will consume user time, IT time and cause some other loss, such as the opportunity to do another project. This issue is methodology neutral: Agile methods will have the same problem if user time is not focused and users are not trained. You cannot fulfill the requirements until they're precise and complete and you understand why they're important to the business.
2. Features are not requirements. Eliminate decisions made by squeaky wheels --- sometimes referred to as "design by whine" -- where the loudest department gets the most resources. Your goal is to make certain that business decisions made with regard to requirements (and their associated expenditures) will generate the return you're expecting. Start by working backward, to match the problems solved with existing software to identify the problems that must be and can be solved only with new software. Don't lose anything you have now that is essential to the business; it's easy to forget "hidden" requirements that oftentimes are taken for granted or ignored.
3. Work with your resources and manage with discipline. Developing an effective requirements document costs money and managing resources requires discipline. A politically expedient decision, even if it's cost effective in the short run but is not the right decision in the long run, will cost time and money -- eventually. From a strategic point of view, ask if the requirements process itself is going to cost more than it's worth. You will find that using the enterprise requirements documentation process will help you avoid useless meetings, which saves time and money, but more about that later. When the appropriate constituents are communicating with each other, they accept the value of their participation because they can track the project's payback to the entire organization.
4. On-going documentation is essential. It's necessary that you continue to manage your requirements, because sometimes internal departments continue to push for a project, application or feature that was denied in the last upgrade or purchase. Perhaps it wasn't worth the cost, or its payback wasn't acceptable to the enterprise as a whole. By maintaining continuity in your requirements documentation, you can see why a prior request was denied. If the reason hasn't changed, it's likely there is no need to investigate it again -- and you can avoid bringing in a "new" solution to solve an equally "new" problem. Referencing prior documentation also can help you eliminate ongoing costs for applications and hardware that are no longer used.
5. Identify and understand the workarounds and desk drawer systems. You need to understand what in your current application made a workaround or desk drawer system an attractive solution. Then, make certain the upgrade eliminates these systems and their causes, with this caveat: You might learn, in the course of such an investigation, that a certain desk drawer system has a unique function or user, and that it's best left alone.
6. Focus your users' attention. You want to learn from them what can be done better, faster or more efficiently, but realize that users don't always know their current business needs. In fact, users at different levels of an organization have different perceptions of business needs, priority and urgency. They tend to segregate by department or management level " dismissing problems because "it's not an IT issue" -- but an effective requirements document requires integration and impact analysis for all departments. Know, too, that the needs of other stakeholders (senior management, operations personnel and human resources, for example) must be considered. User frustration comes from asking for one thing and receiving another; help them articulate their needs carefully and fully. When what a user asks for is not possible, feasible or within budget, say so, because unmet expectations foster dissatisfaction. Always ask what's the relative value of a new "requirement" to avoid spending $10 to save a dime. And don't forget: users take what they have for granted, so make sure it's carried forward in the new request.
7. Benefit from "outside" expertise. An objective outsider, can, will and should ask the questions an insider cannot. What works? What doesn't? What frequent requests create problems because they're difficult to meet with the existing application? That's the outsider's function -- to have no vested interest in how the problem is solved. It's a common pitfall in requirements documentation to describe a problem in terms of its supposed solution -- which might not be the best, or most cost effective, approach. An outsider also can provide useful guidance on how to handle regulatory requirements that affect information systems, but that most business people are not aware of, such as the prohibition against retail businesses retaining credit card numbers after a transaction.
8. Consider your upgrade as an investment and apply metrics to it. A comprehensive requirements document will help you decide if the benefits of the new application or upgrade justify the cost. How much more productive can the organization be with the upgrade, compared to the current application? Track paybacks for projects and information assets to determine when to re-invest or stop further investment. It's possible that an application was a good investment -- at the time. When it was installed, perhaps it saved every one of your 5,000 clerks 30 minutes a day -- but today, you have 5 clerks and it saves them three minutes a day. That feature probably isn't worth the cost. And some stand alone features -- such as desktop publishing -- aren't needed now, thanks to the tools available in word processing applications.
9. Save time. Reduce rework by spending time in the requirements gathering and analysis process, where it's much cheaper to eliminate a "need" than realizing it costs too much (or isn't cost effective) downstream in the design, development or application stage. Time invested in the initial steps of the process provides more time for decision making at the right time. More control of the process will help keep it moving; participants will know what to expect as you move from blue sky thinking to brainstorming to understanding to decision making. Tracking the results of your meetings will document what you've agreed to do and what you've agreed not to do and who made the decision.
10. Save money. To start, you will eliminate ongoing costs for applications and hardware that your requirements information gathering tells you are used no longer. With the right subject matter experts and decision makers involved at the right time, you will not be able to move forward on ideas that sound promising but contain potentially expensive problems that would have to be solved later in the process -- and at a greater cost. You will open many avenues to managing costs, whether it's eliminating unnecessary systems, consolidating a value-added system or evaluating long-term versus short-term value. You might learn, for example, that in the year required to acquire and install a new system the opportunity to use it will disappear. One of the most promising benefits of developing enterprise requirements is the strong possibility you will establish standard solutions to many of your seemingly "unique" problems, obviating the need for custom solutions -- and that can be a real time and money saver.
Wednesday, November 12, 2008

Version Control with Tortoise SVN (part - 2)

TortoiseSVN Visual Studio Integration

Download the following Subversion.zip files which contains some settings files for VS2005 and VS2008
http://www.esnips.com/doc/6fe6f31e-ae60-4838-9be7-6fe22661d0e0/subversionhttp://www.esnips.com/SignInAction.ns?action=forcesign

The settings file gives you a new toolbar, a new menu, and new items on the context menus in the solution view.  You get some nice TortoiseSVN standard icons to make it even easier.

This all works with Visual Studio 2005 and 2008 (and even the Express Editions), along with a standard installation of TortoiseSVN.  Unless you want to edit the commandline in the External Tools I recommend installing TortoiseSVN to the default location.

It’s quick to set up, just go to your “Tools” menu and choose “Import and Export Settings” and follow the instructions. Ensure the tick box for which settings to import are all ticked.  If the settings don’t work first time, try again, as Visual Studio can be a bit flaky when loading.  It will replace your External Tools because they have to be stored in the correct numbered slot due to the way they are implemented in Visual Studio.

Files contained in the Subversion.zip files :

SubversionMenu.vssettings

This is a settings file for Visual Studio 2008.  This adds a menu to the IDE for TortoiseSVN with the appropriate icons.

SubversionMenuToolbar.vssettings

This is a settings file for Visual Studio 2008.  This adds a menu for TortoiseSVN as well as a toolbar using the appropriate icons.

SubversionMenuToolbarContexts.vssettings

This is a settings file for Visual Studio 2008.  This adds not only the menu and toolbar, but also adds the items to the appropriate context menus for files and solutions.

SubversionMenuToolbarContextsVS2005.vssettings

This provides the menu, toolbar and context menus for TortoiseSVN in Visual Studio 2005.

SubversionInstall.vbs

Use this file if you want the external tools only.  These will be appended to the list, otherwise use the settings files.  Don’t use in addition to the settings file.

This simply installs a set of External Tools into Visual Studio for common TortoiseSVN operations. It can be installed on versions above Visual Studio.NET (version 7.0). Currently it is configured for Visual Studio 2008 (version 9.0), to make it work on other versions change the variable “strVisualStudioVersionNumber” as outlined in the file’s comments.

Also, if you have installed TortoiseSVN in a non-default location, make sure that you change the variable “strTortoiseSVNBin” to the correct binary path. Make sure that the backslashes are doubled up.

Supported TortoiseSVN operations

The following Subversion/TortoiseSVN features are covered in the integration:

  • Commit - Commit the files to the repository
  • Update - Update the current working version
  • History - Get the history for the selected file
  • Diff - Get the diff compared to the base version
  • Blame - Find out who committed the crimes in the file
  • Revert - Undo local changes
  • Modifications - Check to see if any files have been modified
  • Edit Conflicts - Edit the conflicts that arise from merging/updating
  • Resolve - Mark the file as resolved for conflicts
  • Repository - View the repository on the server
  • Project History - Get the history of the entire project
  • Add Solution - Add the solution being edited to source control
  • Branch/Tag - Perform a branch or tag on the current working copy
  • Settings - Set up TortoiseSVN


References:
1. tortoiseSVN
https://www.projects.dev2dev.bea.com/Subversion%20Clients/TortoiseSVN.html

Tuesday, November 11, 2008

Some Diff/Merge Tools

If the tools we provide don't do what you need, try one of the many open-source or commercial programs available. Everyone has their own favourites, and this list is by no means complete, but here are a few that you might consider:
WinMerge
WinMerge [http://winmerge.sourceforge.net/] is a great open-source diff tool which can also handle directories.
Perforce Merge
Perforce is a commercial RCS, but you can download the diff/merge tool for free. Get more information from Perforce [http://www.perforce.com/perforce/products/merge.html].

KDiff3
KDiff3 is a free diff tool which can also handle directories. You can download it from here [http://kdiff3.sf.net/].
ExamDiff
ExamDiff Standard is freeware. It can handle files but not directories. ExamDiff Pro is share ware and adds a number of goodies including directory diff and editing capability. In both flavours, version 3.2 and above can handle unicode. You can download them from PrestoSoft [http://www.prestosoft.com/].
Beyond Compare
Similar to ExamDiff Pro, this is an excellent shareware diff tool which can handle directory diffs and unicode. Download it from Scooter Software http://www.scootersoftware.com/].
Araxis Merge
Araxis Merge is a useful commercial tool for diff and merging both files and folders. It does three-way comparision in merges and has synchronization links to use if you've changed the order of functions. Download it from Araxis [http://www.araxis.com/merge/index.html].
SciTE
This text editor includes syntax colouring for unified diffs, making them much easier to read. Download it from Scintilla [http://www.scintilla.org/SciTEDownload.html].
Notepad2
Notepad2 is designed as a replacement for the standard Windows Notepad program, and is based on the Scintilla open-source edit control. As well as being good for viewing unified diffs, it is much better than the Windows notepad for most jobs. Download it for free here [http://www.flos-freeware.ch/notepad2.html].

Sunday, November 9, 2008

Virtualization : Tools and Terminologies

Virtual machine technology applies to both server and client hardware. Virtual machine technology enables multiple operating systems to run concurrently on a single machine. In particular, Hyper-V, a key feature of Windows Server 2008, enables one or more operating systems to run simultaneously on the same physical system. Today, many x86-based operating systems are supported by Virtual PC 2007, Virtual Server 2005, and Hyper-V.


What is virtual machine technology used for?
Virtual machine technology serves a variety of purposes. It enables hardware consolidation, because multiple operating systems can run on one computer. Key applications for virtual machine technology include cross-platform integration as well as the following:
Server consolidation. If several servers run applications that consume only a fraction of the available resources, virtual machine technology can be used to enable them to run side by side on a single server, even if they require different versions of the operating system or middleware.
Consolidation for development and testing environments. Each virtual machine acts as a separate environment, which reduces risk and enables developers to quickly recreate different operating system configurations or compare versions of applications designed for different operating systems. In addition, a developer can test early development versions of an application in a virtual machine without fear of destabilizing the system for other users.
Legacy application re-hosting. Legacy operating systems and applications can run on new hardware along with more recent operating systems and applications.
Simplify disaster and recovery. Virtual machine technology can be used as part of a disaster and recovery plan that requires application portability and flexibility across hardware platforms.
Moving to a dynamic datacenter. Hyper-V, along with systems management solutions, helps you to now create a dynamic IT environment that not only enables you to react to problems more efficiently but also to create a proactive and self-managing IT management solution.

Virtual PC lets you create separate virtual machines on your Windows desktop, each of which virtualizes the hardware of a complete physical computer. Use virtual machines to run operating systems such as MS-DOS, Windows, and OS/2. You can run multiple operating systems at once on a single physical computer and switch between them as easily as switching applications—instantly, with a mouse click. Virtual PC is perfect for any scenario in which you need to support multiple operating systems, whether you use it for tech support, legacy application support, training, or just for consolidating physical computers.

Virtual PC provides a time-saving and cost-saving solution anywhere users must run multiple operating systems. Use Virtual PC in the following scenarios:
Ease Migration: Run legacy applications in a virtual machine instead of delaying the deployment of a new operating system just because of application incompatibility. Test your migration plans using virtual machines instead of actual physical computers.
Do More in Less Time: Support staff can run multiple operating systems on a single physical computer and switch between them easily. They can also restore virtual machines to their previous state almost instantly. Train students on multiple operating systems and virtual networks instead of purchasing and supporting additional computers.
Streamline Deployment: Test software on different operating systems more easily. One crashing application or operating system doesn’t affect others.
Accelerate Development: Increase quality assurance by testing and documenting your software on multiple operating systems using virtual machines. Decrease time-to-market by reducing reconfiguration time.


Configurability
After installing Virtual PC, you can configure it to suit your requirements. Virtual PC has a number of settings that control how the product interacts with the physical computer, allocates resources, and so on.
Easy installation
Virtual PC is simple to install. Any administrator can run the Virtual PC guided setup program, and installation doesn’t require a reboot. The first time Virtual PC starts, it guides you through the process of creating the first virtual machine.
Standardization
Configure and test upgrades and installations on virtual machines, and then you can deploy throughout your company a standard configuration that avoids problems caused by minor differences between hardware platforms.
Convenience
Users switch between operating systems as easily as they switch between applications. They simply click the window containing the virtual machine. They can pause individual virtual machines so they stop using CPU cycles on the physical computer. They can also save virtual machines to disk and restore them at a later time. The restoration process normally takes a few seconds—much faster than restarting the guest operating system.
Host integration
Users can copy, paste, drag, and drop between guest and host. Virtual PC provides additions that you install in a guest operating system to enable this functionality.


function popWin(url){
spawn = window.open(url,'newWin','width=800,height=600,top=0,left=0,location=yes,toolbar=yes,status=true,scrollbars=yes,resizable=yes,fullscreen=no,menubar=no,directories=no');
spawn.focus();
}
Virtualization in Education When it comes to desktop computing in education, flexibility is key. Students, faculty and staff want to be able to access their own data, securely, from all of these locations. This white paper discusses how virtualization technology can help connect educators and students to applications and information from almost any device. »
Step Up Your game: Global Delivery Capabilities for the Electronics Industry How can your business meet the ever-increasing demands of end users and still make a healthy profit? IBM takes a look at innovation's role in driving business objectives and helping electronics enterprises move forward in a lightning fast marketplace. »
Innovation in Action Innovation is powering the energy and utilities network. Get plugged in with the "Innovation in Action: The Energy & Utilities Project" book from Montgomery Research Inc. and IBM. »
The Agile CFO: Enabling the Innovation Path to Growth Agile CFOs are realizing that they hold a unique and critical position in enabling innovation that matters. CFOs should expand their roles from an historically oriented stance to a proactive participant in driving innovation, change and growth. CFOs who do stand to drive their companies into leadership positions. This paper proposed several actions financial executives can take to become agile CFOs. »
Leveraging Web 2.0 to Accelerate New Service Ideas Learn how telecoms can harness Web 2.0 technologies to help visualize, develop and roll out new services. Get IBM's point of view on how to leverage the power of collaboration in a Web 2.0 environment now! »


In virtualization technology, hypervisor is a software program that manages multiple OS (or multiple instances of the same OS) on a single computer system. The hypervisor manages the system's processor, memory, and other resources to allocate what each operating system requires. Hypervisors are designed for a particular processor architecture and may also be called virtualization managers.

Tuesday, October 14, 2008

An introduction to Mocking

Mocking

When you want to test certain function/feature which is dependent on some other features which might take some time which might not be available at that time then you can Mock that particular module paticular procedure and you will get the result that you want to continue writing your Unit-Test. For example you want to mock the internet connection you can do that. So you want to let say that some of the features are only available when internet connection is established. Now you are in a situation where you can't continue writting your unit-test as there is no internet connection available. So you can mock the internect connection and write your unit-test with Mock object. The Mock object ensures that there is an internet connection but in reality there is no internet connection. So you can basically control there resturn type, you can control outside behaviour of that real object but it is not in reality the real object.

Mocking is an integral part of unit testing. Although you can run your unit tests without use of mocking but it will drastically slow down the executing time of unit tests and also will be dependent on external resources.

There are different types of Mocking frameworks available which allow us to create Mock Objects.
1. Rhino Mock
2. NMock2
3. TypeMock.NET
4. EasyMock.NET
5. Moq

TypeMock in not free.

Links
1. http://www.gridviewguy.com/Articles/447_Introduction_to_Mocking.aspx