Thursday, June 27, 2013

Copy of Yoga for Life

Yoga For Life by
Gaurav Raj Behl

Yoga, Asans, Techniques, Benefits, Posture

Monday, January 3, 2011
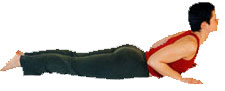
15 - Shithilasan

Importance / Benefits

  • Shithilasan gives us a complete relief from fatigue.
  • This asan is very useful for people suffering from insomnia.
  • It also normalises the irregularities of blood pressure.
Technique
  1. Lie flat on your abdomen at full length.
  2. Resting the right ear on the ground, stretch straight your right arm and right leg.
  3. Keep the forefingers of your right foot straight.
  4. Now fold your left foot at 90 degrees.
  5. Bring the heel of the left foot and touch it with your right knee.
  6. Place your left palm in front of your face.
  7. Relax both your shoulders and let your chest touch the ground.
  8. Breathe normally and stay in this posture for sometime and repeat the same for other side as well.

Posted by Gaurav Raj Behl at 9:05 PM No comments:

Email ThisBlogThis!Share to TwitterShare to Facebook

Thursday, December 30, 2010

14 - Shashankasan

Importance / Benefits

  • This asan is very useful as it provides relief to the body.
  • This asan helps in proper functioning of liver and stomach.
  • This asan is very useful for people suffering for Asthma.
Technique

  1. Sit down in Vajrasan and keep your back and neck erect.
  2. While inhaling, raise your arms over head as high as possible, stretch towards upwards.
  3. While exhaling, bend forward while raising your buttocks. Your hands should be stretched and arms should touch ears. 
  4. Please ensure that while bending forward do not allow your buttocks to come off their position between the heels.
  5. Rest your elbows on the floor and relax your arms. You can touch your forehead on the ground. Breathe normally and maintain this posture for a while.
  6. While inhaling, stretch your arms and return back to Vajrasan.

Posted by Gaurav Raj Behl at 10:33 AM No comments:

Email ThisBlogThis!Share to TwitterShare to Facebook

Monday, December 20, 2010

13 - Ushtrasan

Ushtr means camel in Sanskrit. As the body in this asan is similar to a camel, hence the name.
Benefits / Importance

  • The lower part of the body (lower back) becomes very flexible.
  • This asan helps in strengthening interior parts of the thighs, abdomen & chest. It also helps in reducing excess fat on the hips and abdomen.
  • This asan also increases our capacity to hold the breath.
  • This asan is also very helpful in increasing our height. It also strengthens our heart.

Technique

  1. Sit in Vajrasan and stand up on the knees (equal to the width of your shoulders).
  2. Please make sure that both your feet and your back are parallel to each other.
  3. Place your feet on the ground with soles facing upwards.
  4. Now bring your both the hands on waist in such a manner that both thumbs of your hands touch each other on the spine.
  5. Inhaling slowly, bend the neck backwards. When the bend is complete, take your hands (one at a time) off your waist and put them on the soles of your feet. Keep your breath normal.
  6. Stay in this pose as long as possible.
  7. Come back slowly and rest in Vajrasan.
  8. Please make sure that you do this asan in presence of somebody and in a controlled & slow manner.

Posted by Gaurav Raj Behl at 8:33 PM No comments:

Email ThisBlogThis!Share to TwitterShare to Facebook

Friday, December 17, 2010

12 - Vajrasan

Importance / Benefits

  • Vajrasan helps in toning up the digestive system.
  • It helps in strengthening our knees & thighs.
  • Sitting in this asan for 5-7 minutes is equivalent to benefits one gets from a long walking session.
  • It helps in reducing tiredness in the body.
  • This asan is also helpful in stabilising the mind, hence, it is also useful to perform meditation in this asan.

Technique

  1. Sit erect with your legs stretched out fully in front.
  2. Place the palms of both hands on right side putting the entire weight of the body on them.
  3. Fold back your knees and sit on them.
  4. Keep your knees and toes together.
  5. Rest your palms on your knees.
  6. Sit erect with body relaxed & breathe normally.

Posted by Gaurav Raj Behl at 2:12 PM No comments:

Email ThisBlogThis!Share to TwitterShare to Facebook

Tuesday, December 14, 2010

11 - Yogmudra

Importance / Benefits

  • Yogmudra helps in curing all the disorders of liver such as lack of blood supply, swelling etc.
  • All the parts of urinary system are toned up and their functional capability also improves.
  • Yogmudra also helps in toning up our digestive system.
  • It also helps in regulating the flow of blood in the brain.

Technique

  1. Sit in Padmasana. Keep your neck and waist erect.
  2. Take your both arms behind your back and hold your left wrist with your right hand.
  3. While inhaling stretch your body upwards and then exhaling, bend downwards from hip-joints very slowly & try to rest the forehead on the ground.
  4. Breathe normally and maintain this posture for a while.
  5. Now, inhaling and stretching both the hands come back to the original pose (#2).
  6. Make sure that your wrist while stretching touches your waist-line.

Posted by Gaurav Raj Behl at 4:29 PM No comments:

Email ThisBlogThis!Share to TwitterShare to Facebook

10 - Konasan

Konasan is the opposite of Pashchimottanasan. In Pashchimottanasan, the body is bent forward whereas in Konasan, the body is bent backwards.
Importance / Benefits

  • Konasan is helpful in strengthening our shoulders and wrists.
  • This asan is very useful for people who suffer from cervical, Spondylitis and dislocation of the disc.

Techinique

  1. Sit on the asan (yoga mat, sheet etc), joining your heels and toes. Stretch your legs forward.
  2. Place the soles of the feet on the ground as far as possible.
  3. Place your hands (palms) on the ground in a manner that the fingers are pointed outward (see first image) 
  4. Now balancing the body on your palms and feet, start inhaling and raise your body upwards. Your weight should be on your palms and heels (see the second image)
  5. Bend your neck backwards. Normalise your breath and stay in this pose for a  while.
  6. While exhaling, return to the original position very slowly.
  7. Relax.

Things to remember

  • Do not bend your knees at all.
  • Try and raise your body as much as you can and see whether you can touch your soles to the ground.

Posted by Gaurav Raj Behl at 3:51 PM No comments:

Email ThisBlogThis!Share to TwitterShare to Facebook

09 - Paschimottanasan

Paschimottansan involves stretching the lower back parts of body. This is the most effective and beneficial asan as it helps in making our spine and abdomen more flexible.
Importance / Benefits

  • This asan makes the spine flexible. It also helps to reduce stiffness in the lower part of the body.
  • It helps in curing piles and bad cold.
  • Since there is an effect on our abdominal region while doing this asan, it helps proper functioning of our glands.

Techniques

  1. Sit on the asan (mat, sheet etc). Joining your heels and toes together, stretch the legs forward.
  2. Sit straight and stretch your back upwards.
  3. While inhaling, raise both your hands towards sky and stretch upwards.
  4. While Exhaling, start bending forward from lower part of your waist till your forehead touches your knees.
  5. Rest on your knees and grab your toes with your both hands. Normalise your breath.
  6. While inhaling, come back to the original position (#2)

Things to Remember

  1. Do not bend your knees at all.
  2. Both your back and hands should remain stretched.
  3. This asan is not advisable for people suffering from blood pressure, having backache or heart patients

Posted by Gaurav Raj Behl at 2:27 PM No comments:

Email ThisBlogThis!Share to TwitterShare to Facebook

08 - Janushirasan

Importance / Benefits

  • Janushirasan is very useful in curing gastric trouble.
  • This asan is also very beneficial for people suffering from diabetes as it stops the flow of sugar in urine.
  • It helps making our spine flexible.
  • It also helps in strengthening our back muscles, ankles, calves, thighs and knees.
  • It also helps in increasing our digestive power.

Technique

  1. Sit on the asan (yoga mat, sheet etc) with legs stretched forward.
  2. Bend your right leg and touch the sole its foot sole to your left thigh (as shown in the picture)
  3. Keeping the lower part of the body straight, inhale and stretch both your hands towards the sky.
  4. While exhaling, bend and hold your left foot with both the hands.
  5. Try to touch your forehead to your left knee. Normalise your breath.
  6. Repeat the above step for the other foot as well (left foot)

Posted by Gaurav Raj Behl at 12:50 PM No comments:

Email ThisBlogThis!Share to TwitterShare to Facebook

Monday, December 13, 2010

07 - Kamarchakrasan

Kamarchakrasan is made of up following words:

  • Kamar means waist
  • Chakra means wheel
This asan is so called as the entire region of waist, hips is turned around like a wheel.
Importance / Benefits
  • This asan is very helpful in making our lower back very flexible.
  • It helps in reducing extra fat on our waist and buttocks.
  • It helps strengthening abdominal muscles.
  • It is also very helpful in keeping our liver healthy.

Technique

  1. Sit and spread your feet on either side as wide as possible.
  2. First, try and hold your left toe with your left hand and right toe with the right hand. This is the initial warm up pose for Kamachakrasan which will stretch your lower back. Hold like this for 30 seconds.
  3. Exhaling, turn round towards left hand side first and hole your left toe with your right hand & try to touch the your forehead with your left knee. Keep your left hand behind your back.
  4. Inhaling, return to the normal position (sit straight)
  5. Exhaling, turn round towards right hand side and hold your right toe with your left hand & try to touch your forehead with your right knee. Keep your right hand behind your back.
  6. Inhaling return to the normal position (sit straight)
  7. Repeat this process for at least 10 times.

Posted by Gaurav Raj Behl at 8:29 PM No comments:

Email ThisBlogThis!Share to TwitterShare to Facebook

Sunday, December 12, 2010

06 - Navasan

Importance / Benefits

  • Navasan is very useful in bringing flexibility in lower part of our body.
  • It is very useful for our leg muscles and joints.

Technique

  1. Lie down on the back
  2. Stretch your legs forward while keeping your heels and toes together.
  3. Stretch both your hands towards your head keeping the gap between the hands as wide as your shoulders.
  4. While inhaling, left your legs and move them behind your head and try to stretch so that your feet touch the ground.
  5. While exhaling, bring back the feet slowly & try to touch the forehead with you knees and toes with your hands.
  6. Repeat this at least 5 times.

Important things to Note

  1. Please note that do not exert unnecessary force while doing this asan. It is not essential in the beginning that your feet touch the ground or your forehead touch your knees.
  2. Both the heels and toes should remain fully stretched.
  3. Do not give any jerk while doing this asan, please do it in a slow & controlled manner as per your capacity.

Posted by Gaurav Raj Behl at 11:14 AM No comments:

Email ThisBlogThis!Share to TwitterShare to Facebook

Wednesday, December 8, 2010

05 - Tadasan

Tadasan is named after the Palm Tree (Tad in Hindi language). The position of the body in this asan remains straight like a palm tree. This asan serves as a link between the sitting and standing asans. This asan is useful for all persons in general but for ladies and children in particular it is most beneficial.
Importance / Benefits

  • Tadasan is very helpful in increasing height.
  • It removes heaviness of buttocks and helps curing obesity.
  • It cures ailments such as arthritis, pain in calves.
  • It energises the heart, makes our lungs & shoulders strong.
  • It helps in reducing shivering of hands and feet in old age.

Technique

  1. Lie on your back.
  2. Join your heels and toes.
  3. While inhaling, stretch the hands backwards to the maximum at one end and the feet at the other end.
  4. Hold your breath for few seconds.
  5. While exhaling, relax and return to the original position slowly.
  6. Breathe in a normal way & concentrate on the whole body.

Important things to remember

The most important thing to be kept in mind is that while performing this asan, first inhale the breath and then stretch the body.

This asan can be done while standing as well. Inhale and start stretching the arms towards the sky. Raise the heels too. Return to initial pose.

Posted by Gaurav Raj Behl at 10:07 PM No comments:

Email ThisBlogThis!Share to TwitterShare to Facebook

04 - Surya Namaskar

Surya Namaskar is an asan which consists of most number of postures. There are total 12 postures in Surya Namaskar. I'll first enumerate some of its benefits.
Importance / Benefits

  • Surya Namaskar helps in making the cervical portion in the spine elastic & free from disorders.
  • It is also very helpful in improving the digestive system.
  • It helps in supplying sufficient quantity of blood to the brain.
  • It is also helpful in keeping the blood circulation under control.
  • It is also helpful in development of our emotional sensibility.

Technique

As mentioned above, Surya Namaskar consists of total 12 postures which I'll be explaining now along with the relevant pictures.

First Pose

  1. Stand erect on your asan (yoga mat, sheet etc) with your heels joined & front feet apart.
  2. Bring both hands in close contact with either side of your body (as shown). Join your hands together.
  3. The breathing should be normal and body absolutely erect.
  4. While your hands are joined together, keep your elbows straight & parallel to the ground.
  5. Close your eyes while your shoulders remain tension-free.

Second Pose

  1. While inhaling, stretch your hands towards the sky. Arms should remain straight and close to ears.
  2. The distance between the hands should be as wide as your shoulders.
  3. Slowly bend back your both hands, neck and body. Make sure that the lower part of the body remain in its natural position.
  4. Please make sure that no unnecessary force is exerted while bending back.

Third Pose

  1. While exhaling your breath, bring your both arms forward and bend your body down. Please do this slowly & make sure that your arms are close to your ears.
  2. While bending, try to stretch your arms towards the ground and try to place them on the left and right side of your feet.
  3. Also, try to touch your forehead to your knees.
  4. Please note that the knees should not bend in any case while doing this asan.

Fourth Pose

  1. While inhaling, take your left leg backwards and rest your toe on the ground. Keep your waist downwards while doing this.
  2. Keep your chest stretched forward & try to bend your neck as far backward as possible.


Fifth Pose

  1. While exhaling the breath, now take your right leg backwards and place it with your left leg.
  2. Close the heels & place them on the ground.
  3. Raise your hips upwards to max & take your body as far back as possible.


Sixth Pose

  1. While inhaling, bring your body parallel to the ground.
  2. First place your knees on the ground, then chest & then your forehead.
  3. Stomach should be slightly raised above the ground.
  4. Make your breath normal (breathe normally)
  5. Please note that it is very important that your palms and forefingers should not move from the place they were originally placed.

Seventh Pose

  1. While inhaling, raise your body & move it forward.
  2. Keep your chest fully stretched forward and the neck bent backward as far as possible. 
  3. Please make sure that your knees remain fully on the ground in this asan.

Eighth Pose

Eighth pose will be same as the fifth pose. Bring your right leg towards front.

Ninth Pose

Ninth pose will be same as the fourth pose. Bring  your left leg towards front.

Tenth Pose

Tenth pose will be same as the third pose. Raise your body back (towards standing pose) with your arms still stretched.

Eleventh Pose

Eleventh pose will be same as the second pose.

Twelfth Pose

Twelfth pose will be same as the first pose.

Posted by Gaurav Raj Behl at 9:04 PM No comments:

Email ThisBlogThis!Share to TwitterShare to Facebook

Sunday, December 5, 2010

03 - Trikonasana

The word 'Trikon' means 'Triangle' in Sanskrit. The posture resembles that of a triangle in this asan. Hence the name.
Importance/Benefits

  • Body becomes light, spine & its adjoining muscles are strengthened. 
  • This asan is very useful for ladies.
  • While strengthening the muscles, it reduces the excess fat accumulated.
  • It activates all the organs located in the abdominal region.
  • Liver, kidneys, pancreas are also benefited by this asan.
  • It enhances the capacity of holding breath for a longer period of time.

Technique

  1. Stand up on the asan. Keep your feet apart at a distance of around 2 feet.
  2. Raise the right hand up, keeping it close to the right ear & while inhaling, stretch it towards the sky.
  3. The left hand should be stretched downwards.
  4. Exhaling, stretch the left hand slowly towards the ground till the left palm touches the ground.
  5. The palm of the right hand should be pointed downwards and parallel to the earth.
  6. Stay in this pose as per your capacity. Do not force your body.
  7. Inhaling, return to the original position slowly.
  8. Repeat the same process on the other side as well.

Posted by Gaurav Raj Behl at 7:30 PM No comments:

Email ThisBlogThis!Share to TwitterShare to Facebook

02 - Ardhchandrasana

The word ARDHCHANDRASANA is made of mainly 2 words:

  • ARDH: means Half in Sanskrit
  • CHANDRA: means Moon in Sanskrit
If we combine the English translations of the words above, we get half-moon, which is exactly how the body looks like while performing ARDHCHANDRASANA.
It is a very simple and useful asan for its effectiveness on our abdomen and other parts.
Importance/Benefits
  • This asan cures constipation as it exercises a great pressure on both sides of the intestine.
  • It strengthens the muscles attached to the spine as well as the nervous system.
  • It reduces extra fat gathered on our hips & buttocks.
  • It broadens the chest, strengthens our knees & thighs.
  • This asan is also helpful in increasing the height of children.
Technique
  1. Stand on the asans with heels and fore-feet fingers joined together.
  2. Inhaling, stretch both the arms upwards, keep your arms stretched and do not bend your knees.
  3. Bend towards your left or right (as shown in the picture) from the waist as per your capacity.
  4. Exhaling, return to original position very slowly (#2).
  5. Repeat this on the other side.
  6. Do not bend forward in either case.

Posted by Gaurav Raj Behl at 10:17 AM No comments:

Email ThisBlogThis!Share to TwitterShare to Facebook

Friday, December 3, 2010

01 - Padmasana

Activities that can be done prior to doing Padmasana:

  • Stretch your legs (while sitting).
  • Rotate feet clockwise/anti-clockwise.
  • Stretch toe towards front and back.

Technique

  1. Be seated and stretch your legs in front of you by joining them together.
  2. Fold the right leg and place the heel of the right foot on your left thigh.
  3. Fold the left leg and place the heel of the left foot on your right thigh.
  4. Try to bring both the heels closer to each other.
  5. Keep your neck and spine straight.
  6. Place both the hands on you knees (as shown).
  7. Close your eyes & sit for 2 minutes.

Importance/Benefits of Padmasana

  • The body remains fully erect in Padmasana.
  • It helps to cure all types of pains of the legs and feet.
  • By sitting in the Padmasana for a longer period of time, blood circulation in the feet is reduced. Therefore, the blood saved can be utilised in the brain for meditation.
  • Padmasana boosts the concentration of the mind that helps in the process of meditation.

Posted by Gaurav Raj Behl at 4:38 PM No comments:

Email ThisBlogThis!Share to TwitterShare to Facebook

Starting Yoga

Before we begin, I'd like to enumerate different categories of asans (postures). Asans can be categorised into 5 different categories listed below:

  1. Asans for Meditation & Concentration.
  2. Asans practiced in the standing pose.
  3. Asans practiced in the sitting position.
  4. Asans practiced while laying on the stomach.
  5. Asans practiced while laying on the back.
There are countless number of asans which can be practiced but doing all of them is not advisable. A well-defined Yoga schedule should cover enough asans to cover all the body parts. Hence, starting this post I'll write about the Yoga asans (or a schedule) which my mother followed and taught me. Asans covered in this schedule will cover almost all the body parts and would solve the purpose.
For maximum results, please try and follow the asans in the sequence enumerated below:
(The links for the asans will become active as I complete them)
  1. PADMASANA
  2. ARDHCHANDRASANA
  3. TRIKONASAN
  4. SURYA NAMASKAR
  5. TADASAN
  6. NAVASAN
  7. KAMARCHAKRASAN
  8. JANUSHIRASAN
  9. PASCHIMOTTANASAN
  10. KONASAN
  11. YOGMUDRA
  12. VAJRASAN
  13. USHTRASAN
  14. SHASHANKASAN
  15. SHITHILASAN

Posted by Gaurav Raj Behl at 4:35 PM 2 comments:

Email ThisBlogThis!Share to TwitterShare to Facebook

Thursday, December 2, 2010

Yoga - Before We Start

Important Instructions

There are certain important instructions which needs to be kept in mind before we start Yoga. Please read carefully the following points below:

  • People who have suffered heart attack should not do any asan for one and a half months. They should seek proper advise from their doctor first. At the time of starting yoga, they must first do simple exercises for some time. Holding of breath is not advisable.
  • If the maximum blood pressure is more than 150 or minimum is more than 90, avoid difficult postures (asans)
  • Yogasans (postures) should be practiced according to one's physical capacity. Do not force your body unnecessarily.
  • In case of an illness, resume Yoga only after consulting an expert Yoga teacher.
  • Practice of Yoga is advisable on an empty stomach only.
  • The place selected for Yoga should be neat and clean, preferably an open park.
  • Take light meals half an hour after yoga or a glass of water after 15 minutes of practicing yoga.
  • Asans can be done both in the morning and evening.
  • Beginners should first begin with simple postures (asans) and gradually proceed with the difficult ones.
  • Keep the eyes closed and maintain silence while practicing asans.
  • For practicing yoga, the dress should be light and loose-fitting
There are many other important points to be considered while doing yoga asans which I'll mention in the later sections.

Posted by Gaurav Raj Behl at 9:42 PM 2 comments:

Email ThisBlogThis!Share to TwitterShare to Facebook

Yoga - An Introduction

Yoga Means 'Union', union between mind, body & spirit. Many people think that Yoga is all about stretching. Its true Yoga involves stretching, but its really about creating a balance in the body through developing both strength and flexibility. Yoga helps us in developing our personality and also a sound and disciplined life. Yoga also inculcates in us a sense of discipline & we feel encouraged at every stage of life. Practice of Yoga keeps us far away from ailments and enhances our work efficiency.
The role of Yoga is very important as it makes us strong, healthy, happy, active and helps preserve energy. Some people resort to exercises such as walking, lifting weights, running etc but there is a great amount of difference in performing yoga as opposed to the activities mentioned above. For instance, while walking the blood circulation is faster in the lower part of the body due to greater activity of the feet and thus requisite quantity of the blood does not reach other parts of the body.
Please note that I am not encouraging people to leave walking or other exercises or I am not condemning walking or other exercises at all, so no offence!
Some Differences between Exercises & Yoga
Below are some brief differences between exercises and Yoga that I've personally experienced and learned over years.

  1. Physical activities causes fatigue whereas yoga relieves you from fatigue and makes the body light and active.
  2. Weak and old people are incapable of doing every kind of exercise whereas they can surely do Yoga in consultation with a specialist.
  3. Sports and exercises cannot be possible in journey while Yoga can be performed while travelling.
  4. While exercising outer muscles are exercised whereas Yoga ensures that both internal and external organs are influenced.
  5. Exercises make body stiff while Yoga makes it elastic.
There are loads of other differences but for now I'll just stick to the above ones. 

My Inspiration

I got the inspiration to start Yoga from my mother who was struggling with her life as she was surrounded by all the physical problems one could ever 

have - Cholesterol, Back pain, Blood Pressure, weak eyesight, Thyroid, 

Asthma etc etc etc.... She was literally living on medicines. Her decision to join Yoga classes gave her a new life and NOW of all the people I know, she is the happiest person in this world. Yoga has transformed her life completely, both physically and mentally. Hence the name of the blog: Yoga For Life.

The aim of this little blog was to give you all only a brief introduction of Yoga along with some personal history and my inspiration. My subsequent blogs will have the Yoga schedule, different techniques (asans) and their benefits.

The next blog will talk about some pre-requisites that one needs to consider before starting Yoga. Click here to to access my next blog.

Posted by Gaurav Raj Behl at 5:32 PM No comments:

My Photo

Gaurav Raj Behl
Sydney, NSW, Australia
View my complete profile

Followers

Simple template. Powered by Blogger.

Sunday, April 28, 2013

Australian Tax

Two type sof income tax Assessment acts are used:
1. Tax Assessment Act 1936
2. Tax Assessment Act 1997

No.1 is gradually being replaced with No.2 as it is more user friendly.

CGT: Captial gains tax introduced in 1985

FBT: Fringe Benefit Tax introduced in 1986

GST: Goods and Services Tax introduced in 2000

Federal Taxes:

1. CGT
2. Customs Duty
3. Excise duty
4. Fringe Benefits Tax
5. Fuel Tax
6. GST
7. Income tax
8. Medicare Levy
9. Withholding tax

State Taxes:
1. Gambling Tax
2. Land tax
3. Payroll Tax
4. Stamp Duty

Tax Formula:
Taxable Income of an Australian = Assessable Income – allowable deductions

Assessable Income: is the income that your are liable to pay income tax on. It is of two types:

  1. Ordinary Income
  2. Statutory income

Ordinary Income :

  1. Income from personal exertion: Salary and wages, bonus, commissions, allowances earned as an employee. Income from these sources is taxed at Marginal tax rates. If you are a resident of Aus, you may quality certain tax offsets (rebates)
  2. Income from property: interests, dividends, annuities, royalty payments. dividend received may qualify for a dividend franking credit tax offset (rebate).
  3. Proceeds from carrying on (running) a business: Profits you earn running your business.

Exempt Income:

  1. Defence force allowance
  2. Family assistance allowance
  3. Educational assistance allowance
  4. Compensation allowance
Notice of assessment
Is a statement you receive from the tax office after you lodge your tax return. It summarises the details of lodged tax return.

PAYG payment summary
At the end of a financial year, if you are  a salary and wage earner your employer gives you a PAYG payment summary individual non-business  statement. This statement has
1. Gross income
2. Allowances you received between 1July to 30 June.
3. Total PAYG withholding tax deducted from your salary. (TDS in India)
 
PAYG statement is just like Form16 in India.
 
Receiving an Allowance:
When you receive an allowance, you can claim a tax deduction for expenditure. But there are some tests to be carried on to identify which allowances are claimable.
 
SG (Superannuation Guarantee)
Under the SG legislation, in addition to paying salary or wage, your employer is obligated to make a superannuation contribution on your behalf to a complying Superannuation Fund (SF). It is currently 9% of of your basic salary. It is purposed to be 12% by 2019-20.
 

INCOME

1 Income from partnerships and trusts
2 Personal services income
3 Net income or loss from business
4 Deferred non-commercial business losses
17 Net farm management deposits or repayments
18 Capital gains (from all sources including shares, real estate and other property)
19 Foreign entities
20 Foreign source income and foreign assets or property, including foreign source pension or annuity
21 Rent
22 Bonuses from life insurance companies and friendly societies
23 Forestry managed investment scheme income
24 Other income (income not listed elsewhere)

DEDUCTIONS
D11 Deductible amount of undeducted purchase price of a foreign pension or annuity
D12 Personal superannuation contributions (generally for the self-employed)
D13 Deduction for project pool
D14 Forestry managed investment scheme deduction
D15 Other deductions – that is, deductions not claimable at items D1 to D14 or elsewhere on your tax return

TAX OFFSETS
T1 Spouse (without dependent child or student), child‑housekeeper or housekeeper
T2 Senior Australians (includes age pensioners, service pensioners and self-funded retirees)
T3 Pensioner
T4 Australian superannuation income stream
T5 Private health insurance
T6 Education tax refund
Tax offsets from the supplementary section of the tax return
Total tax offsets
Adjustments from the supplementary section of the tax return
Private health insurance policy details

FLOOD LEVY
The Government has introduced a flood levy for the 2011–12 year only, to assist flood affected communities to rebuild essential infrastructure.
The flood levy applies if your taxable income is greater than $50,000 and you do not fit into one of the exemption categories

Pay As You Go (PAYG)

YOUR TAX FILE NUMBER (TFN)
Your TFN is shown on your payment summary, as well as on your last notice of assessment. You do not have to quote your TFN on your tax return, but your assessment may be delayed if you do not. If you are new to the tax system and don’t have a TFN, phone 13 28 61.


WHERE TO SEND YOUR TAX RETURN Within Australia
If you decide to lodge a paper tax return, you can use the pre-addressed envelope provided to send it to us, or send it to:

Australian Taxation Office
GPO Box 9845
IN YOUR CAPITAL CITY

Do not replace the words IN YOUR CAPITAL CITY with the name of your capital city and its postcode – they are not needed because of a special agreement with Australia Post.

YOUR RIGHT TO COMPLAIN
If you are dissatisfied with a particular decision we have made, or with one of our services or actions, you have the right to complain.
We recommend that you first try to resolve the issue with the tax officer you have been dealing with, or phone the number you have been given.
If you are not satisfied, talk to the tax officer’s manager.
If you are still not satisfied, phone our complaints line on 1800 199 010.
Other ways to make a complaint:
n go to ‘Contact us’ at ato.gov.au
n write to:
Complaints
Australian Taxation Office
PO Box 1271
Albury NSW 2640
n send a fax to 1800 060 063.


Salary or wages
Did you earn income from any of the following where tax was withheld:
- salary and wages
- commissions
-  bonuses
-  income from part-time or casual work
-  parental leave pay
-  foreign employment
-  amounts for lost salary or wages paid under
           – an income protection policy
           – a sickness or accident insurance policy, or
           – a workers compensation scheme?

image

You need your PAYG payment summary – individual non-business and PAYG payment summary – foreign employment.

Completing your tax return
1 Print the type of occupation from which you earned most of your income at item 1.
2 For each payment summary, write at item 1:
- the payer’s Australian business number (ABN) or withholding payer number
-  write the ‘Total Australian tax withheld’ amounts under Tax withheld
- write the gross payment amounts under Income.
- If you have five payment summaries or less, you have finished this question. Otherwise, repeat this step for your first four payment summaries, then go to step 3.
3 For your remaining payment summaries:
- add up the total tax withheld (including total Australian tax withheld for PAYG payment summaries – foreign employment) and write the total under Tax withheld to the left of G
- add up the gross payment amounts (including total gross payment amounts for PAYG payment summaries – foreign employment) and write the total under Income at G
- leave the ABN entry for that line blank.

image

This question is about payments from working such as:
employment allowances
tips, gratuities
consultation fees
payments for voluntary and other services
all payments from which tax was not withheld, such as
– commissions, bonuses
– casual job income
– insurance payments (income protection, sickness and accident policies).
Employment allowances include:
car and travel allowances, and reimbursements of car expenses
award transport payments (paid under an industrial law or award that was in force on 29 October 1986)
tool, clothing and laundry allowances
dirt, height, site, first aid and risk allowances
meal and entertainment allowances.
If you received a travel or overtime meal allowance paid under an industrial agreement, do not show it on your tax return if:
you spent the whole amount on deductible expenses
it was not shown on your payment summary, and
it does not exceed the Commissioner’s reasonable allowance amount.
You cannot claim deductions for the expenses that you paid for with that allowance.

3. Did you receive any lump sum payments from your employer for:

  1. unused annual leave
  2. unused long service leave?

image 
You will need your PAYG payment summary – individual non‑business, PAYG payment summary – foreign employment or a comparable statement from your payer that shows an amount at ‘Lump sum A’ or ‘Lump sum B’.

Completing your tax return
If you do not have amounts shown at ‘Lump sum A’ on your payment summaries, go to step 4 below.
1 Add up the tax withheld from lump sum A amounts shown on your payment summaries.
Write the total under Tax withheld at the left of R item 3.
2. Add up all lump sum A amounts on your payment summaries.
Write the total at R.
3. Print in the TYPE box at R:
R if the amount related to a genuine redundancy payment, an early retirement scheme payment, or the invalidity segment of an employment termination payment or superannuation benefit
T for all other situations.

If you do not have any amounts shown at ‘Lump sum B’ on your payment summaries, you have finished this question.

4. Add up the tax withheld from lump sum B amounts shown on your payment summaries.
Write the total under Tax withheld at the left of H item 3.
5. Add up all lump sum B amounts on your payment summaries. Divide the total by 20. This is because only 5% is taxable.Write the total at H.

4. Employment termination payments

 image
Employment termination payments (ETPs) are payments you received because your employment was terminated. These payments appear on a PAYG payment summary – employment termination payment.
This item also covers:

  • death benefit ETPs
  • foreign ETPs
  • late termination payments
  • transitional termination payments.

    Do not show the following payments anywhere on your tax return:
    1. foreign termination payments
    2. directed termination payments
    3. ETPs you received as the trustee of a deceased estate.


Types Description
T if you received a transitional termination payment
S if you received an ETP in 2011–12 that was not a transitional termination payment or a death benefit ETP and you had received another such ETP in an earlier income year for the same termination of employment
D if you received a death benefit ETP and you were a death benefits dependant
B if you received a death benefit ETP in 2011–12 and you were not a death benefits dependant and you had received another death benefit ETP in an earlier income year for the same termination of employment
N if you received a death benefit ETP and you were not a death benefits dependant, and code B does not apply.

5. Australian Government allowances and payments (like newstart, youth allowance and austudy payment)

Did you receive any of the following Australian Government payments:
Newstart allowance
Youth Allowance
Austudy payment
parenting payment (partnered)
partner allowance
sickness allowance
special benefit
widow allowance
exceptional circumstances relief payment
interim income support payment
an education payment of any of the following when you were 16 years old or older
– ABSTUDY living allowance
– payment under the Veterans’ Children Education Scheme
– payment shown as ‘MRCA Education Allowance’ on your payment summary
other taxable Commonwealth education or training payments
an income support component from a Community Development Employment Project (CDEP)
a CDEP scheme participant supplement?

6. Australian Government pensions and allowances
Did you receive any of the following Australian Government payments:
age pension
bereavement allowance
carer payment
disability support pension, if you have reached
age-pension age
education entry payment
parenting payment (single)
widow B pension
wife pension, if either you or your partner was of age-pension age
age service pension
income support supplement
Defence Force income support allowance (DFISA) where the pension, payment or allowance to which it relates is taxable
DFISA-like payment from the Department of Veterans’ Affairs (DVA)
invalidity service pension, if you have reached age‑pension age
partner service pension?

7. Australian annuities and superannuation income streams
Australian annuities (also called non-superannuation annuities) are paid to you by Australian life insurance companies and friendly societies.
Australian superannuation income streams (including lump sum in arrears amounts) are paid to you by Australian superannuation funds, retirement savings account (RSA) providers and life insurance companies.
If you received a ‘taxable Australian superannuation lump sum payment’, do not show it here; show it at item 8.
Did you receive Australian annuities or superannuation income streams?

Sunday, April 14, 2013

Silverlight 5.0


When you compile you SL application number of actions are undertaken.

- Your code is verified to be correct.

- Silverlight App is compiled into a DLL. It is the DLL used by silverlight at run time.

These days MSBuild by Microsoft is used to step up the build process. It uses XML model scripts to determine what happens. These scripts contain ordered set of instructions. There are hundreds of predefined tasks. And also you can create your own ones

Actually a visual studio project file (csproj) is really a build script file. It is well formed XML containing build instructions. When you build you application is visual studio it calls MSBuild. MsBuild reads the build instructions and performs the requested build steps. Eventually MSBuild calls the compiler (vbc.exe, csc.exe). The language compiler then compiles the code into executable.

Assemblies

SL apps runs on the client.

A silverlight assembly must be downloaded to the client.

Any assembly you use must be compiled sepcifically for silverlight use.Your company libs, third party .

image

Core assemblies are :

  1. mscorlib.dll
  2. system.dll
  3. system.core.dll
  4. System.Net.dll
  5. System.Windows.dll
  6. System.Windows.Browser.dll
  7. System.xml.dll

Silverlight Add-on Assemblies:

  1. System.Windows.Controls.dll – Tree view, Tab control, date picker, calendar and Grid splitter controls
  2. System.Windows.Controls.Data.dll – DataGrid, DataPager
  3. System.Windows.Controls.Data.Input.dll – Data bound forms, Label, Description viewer, Validation summary
  4. System.Windows.Controls.Input.dll – AutoCompleteTextbox
  5. System.Windows.Controls.Navigation.dll – Frame and Page controls basis of silverlight navigation system.

image

XAML is used to write the code (layout) for silverlight. XAML is used for :

  • Silverlight
  • Windows Phone
  • Windows 8 Metro
  • XPS – XML Paper Specification

XAML is really an XML.
XAML doc is limited to single root element and that root is typically a UserControl element.
Normal XML rules apply to XAML:
    Attributes values must be delimited (“”, ‘ ‘ )
    User proper tag closure (<user></user> or <user />)


XAML elements are mapped to equivalent .NET classes. For example <Button> is an object element in XAML. So using an object element in XAML is same as :

  1. Instantiating an instance of the Button class
  2. Calling the default parameterless constructor.

Attributes:

XAML types has several types of attributes:

  1. Property Attributes: These correspond to object property. For example Width, Height
  2. Event Attributes: These correspond to object events. For example MouseMove
  3. Directive Attributes: These are parser instructions that have no programmatic equivalent. For ex: Assigning a localization ID with x:Uid, x:Name
  4. Attached Property Attributes: For example Grid.RowSpan

XAML Namespaces:

To put groups of elements, it is common to use Namespaces. In XAML using xmlns attrubute we can put elements into a namespace.

Type Converters
These are just like data type casting in .NET.

Markup Extensions

if you need runtime calculation and want that value to be assigned to a property in XAML, then you must use Markup Extensions.

The syntax for markup extension is like :image

Categories of markup Extensions:

  • DataBinding : Get datasource value and assign it to a property.
  • TemplateBinding: get value from a control template and assign to property.
  • StaticResource: Lookup resource defined in ResourceDictionary.
  • Null: Assign null value to a property.
  • Custom: We can create our own markup extension implementing IMarkupExtension interface.

Dependency Properties System:

SL uses a unique property system called Dependency property system. This was invested by WPF team of Microsoft. This new system enhances the underlying .NET framework and promise elements to plugin to useful services like animations, databinding, tempaltes, styles.

Dependency system contains two important parts:
1. Dependency Property
2. Attached Property

image

Creating a dependency property 

Creating a dependency property isn’t difficult, but the syntax takes a little getting used to. It’s
thoroughly different from creating an ordinary .NET property.
The first step is to define an object that represents your property. This is an instance of the
DependencyProperty class (which is found in the System.Windows namespace). The information about your property needs to be available all the time. For that reason, your DependencyProperty object must be defined as a static field in the associated class.
For example, consider the FrameworkElement class from which all Silverlight elements inherit.
FrameworkElement defines a Margin dependency property that all elements share. It’s defined like this:
public class FrameworkElement: UIElement
{
public static readonly DependencyProperty MarginProperty;
...
}

By convention, the field that defines a dependency property has the name of the ordinary property
plus the word Property at the end. That way, you can separate the dependency property definition from the name of the actual property. The field is defined with the readonly keyword, which means it can be set only in the static constructor for the FrameworkElement.

Registering Dependency Property:

Defining the DependencyProperty object is just the first step. For it to become usable, you need to
register your dependency property with Silverlight. This step needs to be completed before any code
uses the property, so it must be performed in a static constructor for the associated class.
Silverlight ensures that DependencyProperty objects can’t be instantiated directly, because the
DependencyProperty class has no public constructor. Instead, a DependencyProperty instance can be
created only using the static DependencyProperty.Register() method. Silverlight also ensures that
DependencyProperty objects can’t be changed after they’re created, because all DependencyProperty
members are read-only. Instead, their values must be supplied as arguments to the Register() method.
The following code shows an example of how a DependencyProperty can be created. Here, the
FrameworkElement class uses a static constructor to initialize the MarginProperty:
static FrameworkElement()
{
MarginProperty = DependencyProperty.Register("Margin",
typeof(Thickness), typeof(FrameworkElement), null);
...
}

image

The DependencyProperty.Register() method accepts the following arguments:
• The property name (Margin in this example).
• The data type used by the property (the Thickness structure in this example).
• The type that owns this property (the FrameworkElement class in this example).
• A PropertyMetadata object that provides additional information. Currently,
Silverlight uses the PropertyMetadata to store just optional pieces of information:
a default value for the property and a callback that will be triggered when the
property is changed. If you don’t need to use either feature, supply a null value, as
in this example.

Attached Property:
An attached property is a full-fledged dependency property, and like all dependency properties, it’s managed by the Silverlight property system. The difference is that an attached property applies to a class other than the one where it’s defined.
The most common example of attached properties is found in the layout containers. For example, the Grid class defines the attached properties Row and Column, which you set on the contained elements to indicate where they should be positioned. Similarly, the Canvas defines the attached properties Left and Top that let you place elements using absolute coordinates.
To define an attached property, you use the DependencyProperty.RegisterAttached() method instead of Register(). Here’s the code from the Grid class that registers the attached Grid.Row property:

RowProperty = DependencyProperty.RegisterAttached("Row", typeof(int), typeof(Grid), null);

Silverlight Panels:

  • Stack Panel
  • Grid
  • Canvas
  • VirtualizingStackPanel (used by List Controls)
  • Wrap Panel
  • Dock Panel

Tip: To jump quickly from XAML to Event handling code, right click the event in xaml and choose Navigate to Event Handler option.

Assembly caching:

By default it is turned off and it can be turned on from Visual Studio project properties.

image 

Silverlight Object Parameters:

Source (required) - A URI that points to XAP file.
onError: A js event handler triggered when unhandled exception occurs.
background
minRuntimeVersion: min version of SL that client must have
autoUpgrade: default is True.
enableHTMLAccess: To access HTML elements within SL code
initParams: string to pass custom initialization information.
splashScreenSource:
windowless: just like transparent
onSourceDownloadProgressChanged:
onSourceDownloadComplete:
onLoad:
onResize'

Binding:

One way Binding:

Element-to-Element Binding
One-Way Binding
To understand how you can bind an element to another element, consider the simple window shown in Figure.
image
It contains two controls: a Slider and a TextBlock with a single line of text. If you pull the thumb in the slider to the right, the font size of the text is increased immediately. If you pull it to the left, the font size is reduced.

Clearly, it wouldn’t be difficult to create this behavior using code. You would simply react to the
Slider.ValueChanged event and copy the current value from the slider to the TextBlock. However, data binding makes it even easier. When using data binding, you don’t need to make any change to your source object (which is the Slider in this example). Just configure it to take the right range of values, as you would ordinarily.
<Slider x:Name="sliderFontSize" Margin="3" Minimum="1" Maximum="40" Value="10">
</Slider>

The binding is defined in the TextBlock element. Instead of setting the FontSize using a literal value, you use a binding expression, as shown here:
<TextBlock Margin="10" Text="Simple Text" x:Name="lblSampleText" FontSize="{Binding ElementName=sliderFontSize, Path=Value}" >
</TextBlock>

Data binding expressions use a XAML markup extension (and hence have curly braces). You begin with the word Binding, followed by any constructor arguments (there are none in this example) and then a list of the properties you want to set by name—in this case, ElementName and Path. ElementName indicates the source element. Path indicates the property in the source element. Thus, this binding expression copies the value from the Slider.Value property to the TextBlock.FontSize property.

Tip: The Path can point to a property of a property (for example, FontFamily.Source) or an indexer used by a property (for example, Content.Children[0]). You can also refer to an attached property (a property that’s defined in another class but applied to the bound element) by wrapping the property name in parentheses. For example, if you’re binding to an element that’s placed in a Grid, the path (Grid.Row) retrieves the row number where you’ve placed it.

One of the neat features of data binding is that your target is updated automatically, no matter how
the source is modified. In this example, the source can be modified in only one way—by the user’s
interaction with the slider thumb. However, consider a slightly revamped version of this example that adds a few buttons, each of which applies a preset value to the slider. Click one of these buttons, and this code runs:
private void cmd_SetLarge(object sender, RoutedEventArgs e)
{
   sliderFontSize.Value = 30;
}
This code sets the value of the slider, which in turn forces a change to the font size of the text
through data binding. It’s the same as if you had moved the slider thumb yourself.
However, this code wouldn’t work as well:
private void cmd_SetLarge(object sender, RoutedEventArgs e)
{
lblSampleText.FontSize = 30;
}
It sets the font of the text box directly. As a result, the slider position isn’t updated to match. Even
worse, this has the effect of wiping out your font size binding and replacing it with a literal value. If you move the slider thumb now, the text block won’t change at all.

Two way Binding:

Interestingly, there’s a way to force values to flow in both directions: from the source to the target and from the target to the source. The trick is to set the Mode property of the Binding. Here’s a revised bidirectional binding that allows you to apply changes to either the source or the target and have the other piece of the equation update itself automatically:

<TextBlock Margin="10" Text="Simple Text" Name="lblSampleText"
FontSize="{Binding ElementName=sliderFontSize, Path=Value, Mode=TwoWay}" >
</TextBlock>

In this example, there’s no reason to use a two-way binding, because you can solve the problem by manipulating the value of the slider rather than changing the font size of the TextBlock. However, consider a variation of this example that includes a text box where the user can set the font size precisely.

image

Here, the text box needs to use a two-way binding, because it both receives the bound data value
and sets it. When the user drags the slider (or clicks a button), the text box receives the new slider value.And when the user types a new value in the text box, the binding copies the value to the slider.Here’s the two-way binding expression you need:
<TextBox Text="{Binding ElementName=lblSampleText, Path=FontSize, Mode=TwoWay}">
</TextBox>

TIP: If you experiment with this example, you’ll discover that the text box applies its value to the slider only once it loses focus. This is the default update behavior in Silverlight, but you can change it by forcing immediate updates as the user types.

When setting margins, you can set a single width for all sides, like this:
<Button Margin="5" Content="Button 3"></Button>
Alternatively, you can set different margins for each side of a control in the order left, top, right,
bottom:
<Button Margin="5,10,5,10" Content="Button 3"></Button>
In code, you can set margins using the Thickness structure:
cmd.Margin = new Thickness(5);

TIP: If you want to divide the remaining space unequally, you can assign a weight, which you must place before the asterisk. For example, if you have two proportionately sized rows and you want the first to be half as high as the second, you could share the remaining space like this:
<RowDefinition Height="*"></RowDefinition>
<RowDefinition Height="2*"></RowDefinition>
This tells the Grid that the height of the second row should be twice the height of the first row. You
can use whatever numbers you like to portion out the extra space.

Tip: Remember, if a Grid has just a single row or column, you can leave out the RowDefinitions section. Also, elements that don’t have their row position explicitly set are assumed to have a Grid.Row value of 0 and are placed in the first row. The same holds true for elements that don’t supply a Grid.Column value.

An event handler that responds to a button press by switching into full-screen mode:
private void Button_Click(object sender, RoutedEventArgs e)
{
   Application.Current.Host.Content.IsFullScreen = true;
}